Thursday, September 7, 2017

Chrome Sign-in Features

Have all of your bookmarks and passwords follow you on any device.  
“I don’t remember what my password is, on my computer it just automatically shows up”.  Have you ever said this? Or hear anyone say something like this? Three is a very easy solution to this dilemma.  By signing in to your Chrome browser it is possible to sync your information to your account making it available on any device you use.  This will enable all of your bookmarks and passwords to follow you as well. This will save you time signing into accounts you use everyday here at school if you end up using a different device.  This is more than just signing in to your Google Account.
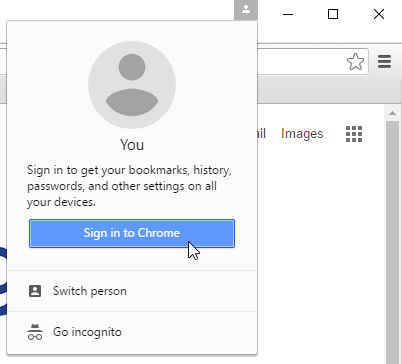
Signing into the Chrome Browser
  1. Look for the little person icon in the upper right corner of your browser window and click on it. 
  2. Click the “Sign in to Chrome” button”
  3. Sign in with your Google account
  4. Link your Chrome data to this account?  Click “Link Data”
  5. You are now signed into Google Chrome.  Click “Ok Got, It”
Once you do this you should see your name appear in the upper right corner where the person icon was previously.  When you go to a new computer simply follow these steps and your info will follow you to the new device.
If you are concerned about signing out of a device, this article from Google should answer your questions. [read article here].
This video demonstrates signing into Chrome.  [Watch it]
Other cool things Google has added over the past three months
  • Google launches new “What’s New in G Suite” page - Resource Link
  • Google Earth gets new Education category with classroom activities - Resource Link
  • Watch the live “Bear Cams” in Google Earth - Resource Link
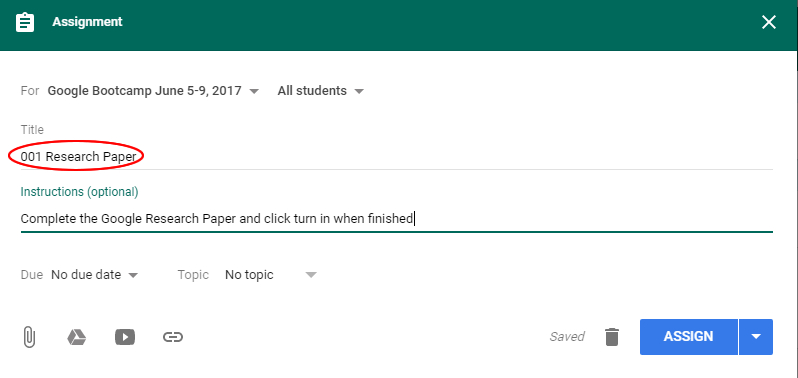
  • Google Forms gets updates including suggested response validations, cross-domain file uploads, save preferences, checkbox grid question type, and section reordering - Resource Link
  • Google Meet gets text chat feature - Resource Link
  • Google Expeditions gets solo mode and annotation tool - Resource Link
  • YouTube shutting down its video editor and photo slideshow tools on September 20 - Resource Link
  • Duplicate Sections in Google Sites - Resource Link
  • Revision History becomes Version History and gets option to name version - Resource Link
  • Easier option to preview and accepts Suggested Edits in Doc - Resource Link


For more helpful information and the archive of previous Check This Out! Digests, go to http://www.greenlocalschools.org/technology.aspx

bulldogstrong.jpg

Green Local Schools
Tech Integration Team

Tuesday, August 8, 2017

Google Classroom Updates

This issue focus on all the updates that have happened in Google Classroom while you were on Summer Break.  
Google Classroom.png
Google is continually adding features and making updates to its products.  There have been several updates made to Google Classroom. Below is a description of the changes:   
Google Classroom Updates
  1. Single View of Student Work: This change will help both teachers and students by providing a page that lists all of a student’s work for that class as well as the status of that work. To access this page, click on the “Students” area, then click on a name of a student to see a page listing all of the student’s work.
  2. Reorder Class Cards: Both teachers and students can reorder the classes on the Classroom homepage.   Now you can put your classes in order by period, subject, or what ever order you want.  To move the order, login to your classroom account and you will then be able to click and drag your classroom tiles in the order you desire.
  3. Decimal Grades: Teachers can now use decimal grades to award partial points on student work. These grades are added just like you did in the past, but now you have the option to include the decimal portion of the grade.
  4. Display the Class Code: At the beginning of the year, teachers can make the class code to join display in full screen making it easier to see.  Go to the “students” area, on the left side next to “Class code” you will see a drop down menu option. From this menu choose “display” and the code will be displayed in a new larger window.
  5. Transfer Ownership: Do you need to give someone else a class that you taught in the past?  Teachers can now transfer ownership to another teacher. To do this the first thing you need to do is invite the teacher to the class to be a “co-teacher”.  Once they are a co-teacher you can transfer ownership by clicking on the three dots by their profile and choose “Make class owner”
Just in case you missed it, I am adding the info from the May Check This Out! Google Classroom Tips.   This issue talked about how to deal with the Google Classrooms you created last year.
What to do with all my Google Classrooms from last year?
If you have spent a lot of time this year building assignments in your Google Classrooms, you don’t want to lose all that work.  Here are some recommendations to continue what you have done next year.
  1. Start the school year with a new blank Google Classroom for each class/period:  You could just remove all the students from the Google Classroom and add next years students, but having all the content for the whole year/semester visible at the start can be overwhelming.  Plus the newest content is at the top, so moving things around can be time consuming for the teacher. Another issue is that due dates and other interactions are no longer valid for this new group, so we recommend always starting with a fresh new Google Classroom.
  2. Archive old Classrooms: Go to Google Classroom main page and click on the three dots.  You will see the option to “archive” the classroom. This will move the classroom out of the main area to help clean up your Google Classroom area.  You can still access the old Google Classrooms and use your old assignments even if the Classroom is in the Archive area.
  3. Pull assignments from previous classrooms: As mentioned in number 6 above.  You can pull in assignments from old Google Classrooms into your new fresh classroom.  This allows you to use assignments and posts from the previous school year in your new Google Classroom.
  4. DON’T DELETE YOUR OLD CLASSROOMS: unless you never want the content in that classroom ever again in your future teaching career.  Once deleted it can’t be recovered.
As you begin to wrap things up for this year and plan for next year, keep these tips in mind!
For more helpful information and the archive of previous Check This Out! Digests, go to http://www.greenlocalschools.org/technology.aspx


bulldogstrong.jpg

Tuesday, May 23, 2017

Google Classroom Tips

If you used Google Classroom this year or not, these tips will help get you ready for NEXT year.  
Google Classroom.png
It was great to see so many of you embracing Google Classroom this year.   We have had students in Google Classrooms from First Grade through Twelfth Grade.  Students are becoming more and more familiar with how to work from within this tool, so if you did not use Google Classroom this year, consider giving it a try next year.  In this edition of the Check This Out! Digital Digest, I would like to give you some Google Classroom tips to think about for next year as well as a recommendation on how to deal with all the Google Classrooms you made this year.   
Google Classroom Tips to Try
  1. Number your Assignments: Adding a number in the title of the assignment will help you in two ways.   First, it will make it easy for you to refer to the assignment to your students,  “Be sure you have finished assignment number 1 in classroom”. Second it will keep your assignment folders in order in the Google Classroom Folder in your Google Drive, making it easier for you to find what you are looking for in the Classroom folder.
  2. Add Descriptions to Assignments: As students continue to realize that all of your materials are in the Google Classroom for your class, it will become a reference point for students that are absent.  Spelling out the details will make it easier for them to complete make-up work.
  3. Distribute Notes: Give each student a copy of your notes, this will allow them to focus on discussion of the material rather than writing notes.
  4. Make a Copy for Each Student: Help save paper, use this feature of Google Classroom to give each student their own digital copy of work.
  5. Google Classroom Routine: Get your students into a routine by starting each class in Google Classroom to look for tasks to begin.  This practice will help you maximize class time - student don’t need to wait for you to tell them what to do.
  6. Re-Use Posts: If you have created some assignments in classroom that really worked, you can reuse these assignments in your new Google Classroom for  the new school year (more below).
What to do with all my Google Classrooms from this year?
If you have spent a lot of time this year building assignments in your Google Classrooms, you don’t want to lose all that work.  Here are some recommendations to continue what you have done next year.
  1. Start the school year with a new blank Google Classroom for each class/period:  You could just remove all the students from the Google Classroom and add next years students, but having all the content for the whole year/semester visible at the start can be overwhelming.  Plus the newest content is at the top, so moving things around can be time consuming for the teacher. Another issue is that due dates and other interactions are no longer valid for this new group, so we recommend always starting with a fresh new Google Classroom.
  2. Archive old Classrooms: Go to Google Classroom main page and click on the three dots.  You will see the option to “archive” the classroom. This will move the classroom out of the main area to help clean up your Google Classroom area.  You can still access the old Google Classrooms and use your old assignments even if the Classroom is in the Archive area.
  3. Pull assignments from previous classrooms: As mentioned in number 6 above.  You can pull in assignments from old Google Classrooms into your new fresh classroom.  This allows you to use assignments and posts from the previous school year in your new Google Classroom.
  4. DON’T DELETE YOUR OLD CLASSROOMS: unless you never want the content in that classroom ever again in your future teaching career.  Once deleted it can’t be recovered.
As you begin to wrap things up for this year and plan for next year, keep these tips in mind!

For more helpful information and the archive of previous Check This Out! Digests, go to http://www.greenlocalschools.org/technology.aspx

Monday, April 10, 2017

Google Tour Builder

Virtual field trips created by you or your students.  


Are you looking for a creative way for your students to show what they are learning in your classroom?   Google Tour Builder may be the solution that allows your students to do just that. With Tour Builder you or your students will be able to plot out locations on Google Earth and then provide descriptions of that location including video and images.  These are extremely easy to put together. Simply login with your Google account and start looking for places to drop pins. Tour Builder allows you to create a digital story of locations that can then be presented in the order you specify.
Example Ideas of how a classroom teacher may use Tour Builder
  • Social Studies - Create a tour of all the major battle sites of World War II.
  • Language Arts - Mapping Fogg's Trip in “Around the World in Eighty Days”
  • Science - A timeline of the significant scientific discoveries of the 20th century mapped geographically
  • Mathematics - Virtual tour of various architecture that possess unique geometric characteristics.
  • Foreign Language - Explore the culturally significant locations of countries in which Spanish is the native language.
  • Physical Education - Create a tour of the last ten Summer Olympic venues.
  • Art - Map out the birthplaces of the ten most influential artists in history
I am sure you can come up with different ways your students can tell digital stories with this tool.   Here is a short video that provides a  teacher's perspective of Tour Builder.
How do I access Tour Builder
  1. Go to https://tourbuilder.withgoogle.com/
  2. Signin with your Google Account
  3. Click “Create a Tour”
  4. Give the tour a name and put your name in as the author, click “Create Tour”
  5. Add your content
The first slide is the introduction slide.  To add new slides which are new locations, simply click the “Add Location” button.  You can use the “Search for a location” search box to help you get to a location to drop a pin.
If you need help creating a tour, just put in a help desk ticket and choose “Tech Integration” as the category.
For more helpful information and the archive of previous Check This Out! Digests, go to http://www.greenlocalschools.org/technology.aspx

Monday, March 6, 2017

Convert PDFs to Docs

Tired of trying to assign PDFs to your students? Convert them to Google Docs.  
unnamed.pngTOgoogle docs.jpg
Every once in awhile I run across something that is so ridiculously easy, I think how did I not know about this.  Last month I attended OETC and attended a session where this trick was shown. I am sure there are many of you that already know this trick, but for those of you that don’t it may change the way you assign documents to students in Google classroom.  Converting a PDF to a Google Doc that is editable may be the format you want use when assigning a worksheet to your class.
Here is how it works:
  1. Upload the PDF to your Google Drive (put it in a folder or location that makes sense to find it later).
  2. Right click on the PDF document
  3. Choose “Open with”
  4. In the submenu choose “Google Docs”
You will see a new tab open with the Google Doc icon.  In a few seconds it will convert the PDF to a Google Doc and create a file in the same folder as the PDF that is a Google Doc.  I have created a video that demonstrates the steps.

For more helpful information and the archive of previous Check This Out! Digests, go to http://www.greenlocalschools.org/technology.aspx