Friday, July 8, 2016

Google Waze

Get the best route, every day, with real-time help from other drivers.  Real people working together in the best GPS app I have ever used!
My first big summer activity was taking my 14 year old down to Columbus for the Nation's State Baseball Tournament.  Between driving to different fields, hotels, and restaurants, I needed a lot of help getting around. I am not real familiar with Columbus and find driving in that city very frustrating, so for this trip I downloaded the Waze app (shown above) and was extremely happy with all the features.
The great thing about this app is that a community of users help you know real time information on traffic conditions, helping you take the best and fastest route to your destination.  Here are some of the features:
  • Get alerts when approaching police, accidents, road hazards, traffic jams (shared by actual drivers also using the app)
  • Community edited maps that show changes to roads at the local level
  • See friends who are driving to the same destination when you connect via facebook.
  • Find the cheapest gas through community-shared gas prices.
  • Save trips in a favorite areas
  • Schedule trips and be given the best time to leave to arrive on time.
  • Automatically recalculates your route if you miss a turn or decide not to follow the recommended route.
  • 100% FREE!
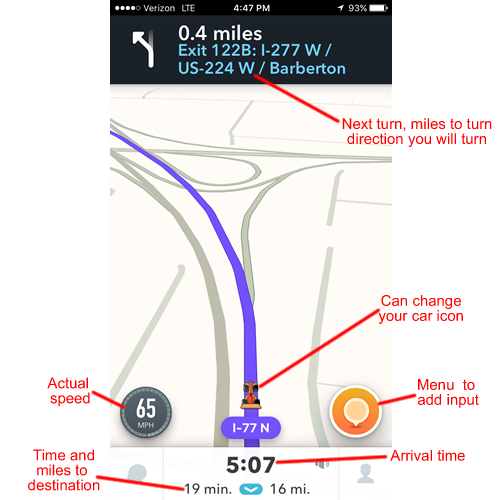
One of the things I like the best is the voice guidance.  It gives instructions early enough for you to know what your next turn is as well as when you make the turn, an idea of what is coming up next.  For example “Exit on left on exit 2A and stay right”. The display shows you the miles to your next turn, icons of upcoming issues, estimated arrival time, how long the trip is in miles and time, and your speed versus the speed limit.  

I can’t say enough about this app - give it a try on your next summer trip.   I don’t think you will be disappointed.
Waz Screen.png
In the next issue we will start to get into some things you can use in your classroom.

Have a nice rest of your summer

Thursday, July 7, 2016

Google Photo

Just in time for Summer, see how Google Photo can clear space on your cellphone for all those memorable Summer activities.
google photo icon.png
If you are like me you have a lot of pictures saved on your phone.  I am always reluctant to delete them off my phone and rarely plug my phone into a computer to move them off.  So what can you do when you phone starts telling you that you are out of storage space? This is where Google Photo can help by storing the photos in the cloud and allowing you to delete them from your phone.  Here are the steps to be successful with Google Photo:
Step 1: Install Google Photo on Your Device
Works on Android and iOS devices, there is also a web-based version that will work on your desktop PC or Mac. The app icon will look like the image above.
Step 2: Select the Quality Level
You have two choices here.  High quality is free but will reduce the file size.  For most of us this should be fine as it is still a nice photo and is able to reproduce a sizable print (12X14) of good quality. Once you make this selection, Google Picture will begin to move copies to the cloud.  I had around 300 images on my phone and began the process at 10:00 one night. I noticed that it was still moving images the next day at school and it finished around 11:00. I selected the option of only backing up when connected to WiFi so I didn’t use my phones data allowance.  Going forward when you open the Google Photo app it will backup any new images you have taken.
Step 3: View Your Images in the Cloud
If you log into your Google account you should now be able to see the photos (and videos) you had on your phone using the Google Photo web app.  The nice thing is that you can also use any of these images in other Google Apps (i.e. Docs, Slides, Sites, etc). One thing you should be aware of, if you delete an image from Google Photo you will also delete it from your other locations.  Google gives you a warning first, but just be sure you never need the photo again.
Step 4: Have fun with Your Images
Now you can edit the images using some of the basic editing tools like cropping or rotating,  adjust brightness or contrast, or use some color filters. You can also create collages, animations and stylized photos as well.  If you really get into it, you can create albums, movies, and stories as well! Wait a minute - did this just give you some ideas of how you might use Google Picture with your students?  Sorry that was a mistake, I know you are on Summer Break!
Step 5: Clear Space on Your Phone
Feel free to delete the photos from your phone’s picture area because now they are in the cloud.  To clear space on an iPhone (steps 1-7) Android Device (steps 1-4):
  1. Make sure your photos and videos have been backed up. (Items that are not backed up will have this icon .)
  2. Open the Google Photos app .
  3. At the top left, tap Menu , then Settings.
  4. Tap FREE UP SPACE and follow the instructions.
  5. When you see a prompt asking for permission to delete photos, tap Delete.
  6. Open the iOS Photos app (not the Google Photos app).
  7. Go to the Recently Deleted album and delete those same photos and videos.
If you want to keep some photos on the device, simply delete the pictures individually in the picture area.  If you need more information: https://support.google.com/photos/
Enjoy the extra space!