Showing posts with label Extensions. Show all posts

Tuesday, March 24, 2020

Using Kami with Remote Learning

Using Kami

Annotate right on top of your PDF assignments.

Created by Scott Aten, March 24, 2020
I know we are on Spring Break, but I wanted to get this to you in the event that you are working/planning things for next week when we begin "Remote Learning".  Kami has been an app/extension that we have been using in the district for several years.  I have done various trainings on it in the past and I know many of you use it.  To put it in simple terms, Kami allows both staff and students to annotate on top of PDF documents.  As a result of being off school, the creators of Kami are making the full version of their tool available till July.  With this in mind, I have prepared some lessons on how you can use Kami with your students..

The lessons include:
Setting Up a Kami Assignment - In this video you will see how to add the Kami extension, how to record your directions for the assignment directly on the PDF document, and how to assign the PDF directly through Google Classroom.


The Student View of a Kami Assignment - In this video you will see the assignment given in part one from the perspective of the student.  In the assignment the student uses the text to speech tool, the dictionary tool, the highlighter tool, and the drawing tools to complete the work.  You will also see the student turning in the work to Google Classroom.

Grading a Kami Assignment - Continuing with the same sample assignment, this video shows how the teacher can grade the Kami assignment in Google Classroom and use many of the Kami tools.  This demonstration includes how a teacher can essentially use a "red pen" to mark on a student's assignment, provide a recorded comment, and add a text box message directly on the students work.  Finally, I demonstrate how to return this work to the student allowing them to see all the notations you added to their assignment.

More Kami Tools - this final video shows how some of the additional tools can be used in assignments.  The Equation Tool is great for math, science, and music.  The drawing tools are shown in a math lesson.  The insert image tool is used for a Social Studies type activity.  MATH, SCIENCE, MUSIC

Great Google Classroom integration - Check it out!

I added all of this information on the Remote Learning part of the Green Google Training Center, so you don't need this email to find it in the future.


For more helpful information and the archive of previous posts, look for items in the menu to the left.


bulldogstrong.jpg

Green Local Schools

Tech Integration Team

Friday, October 4, 2019

Google Cast for Education

Google Cast for Education

Allow students to "Broadcast" their Chromebook for the class to see.

Created by Scott Aten, October 4, 2019
I have actually talked about this extension in an earlier post, but Marc came across someone at a meeting at NEOnet that created these step-by-step directions that walk you through exactly what
needs to happen both on the teacher side and the student side.

So let's review what the Google Cast for Education extension will do. It allows the teacher to broadcast any student device. Since we are essentially 1-1 in the district, all students have a Chromebook or
access to a Chromebook while in your class. You can now have them show their screen to the entire
class (projected) by "casting" to the teacher computer. This is a great tool for presentations, demonstrating a skill to the class, or asking a question in which the entire class may benefit.

Here is what we found [link to the document itself]

Teacher PC Setup

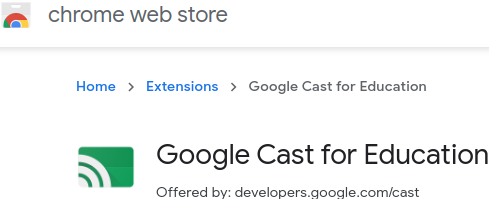
  1. Download the “Google Cast for Education extension from the Chrome Web Store


  2. In the Chrome browser, go to the URL Chrome://flags/#enable-native-notifications
    Disable “Enable native notifications”, then close Chrome and restart it.
  3. In the top right corner of the Chrome browser click on the Google Cast for Education extension icon


  4. Add A “Receiver Name” I would suggest using your 2 digit building abbreviation and your room number.  Ex:High School room 1106 would use “HS1106”.
    *It is recommended that you check only the top 2 settings options and then click save. 

  5. Set sharing permissions for users who will be able to Cast to your teacher computers “Cast receiver”.
    *It is recommended to share only “Can Request” permissions to students, specifically students in your class.  The easiest way to do this is by sharing to the whole Google classroom.
  6. In a few seconds your teacher PC will get a popup in the bottom left corner.  It will list the students name (in this case:HS Student) and say what they are trying to present (in this case: a New Tab) you will have the ability to Accept if you want that student to display that source on your desktop computer screen.
    *For most, it would also display on your projector
Student Setup

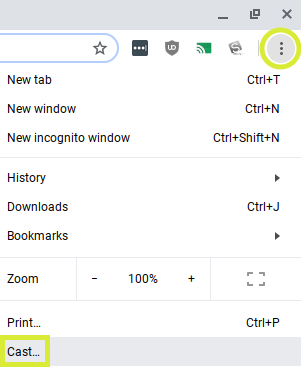
  1. Click the 3 dots “options” button in the top right of the Chrome browser, then select the “Cast…” option.

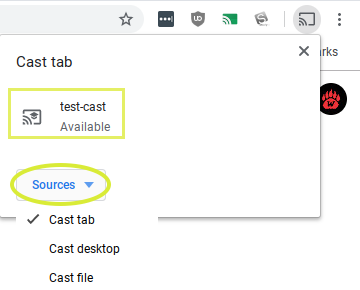
  2. If it says “No devices found” the students will need to perform step 3, otherwise go to step 4.

  3. Two-finger click (right-click) on the cast icon that appears in the extension bar, then go down and check “Enable cloud services”.  When step 1 is completed again, it should now show all available Cast receivers (that the student has permissions to).

  4. Before connecting to the Available Cast receiver first drop-down “Sources” and select what you want to cast to the teacher display: just the active tab, your desktop (all windows), or just a file.  Once you select the proper source then you may click on the cast receiver you want to cast to.

And that is all you need to do to have your students "broadcast" their Chromebooks to your device.

[Green Google Training Center]


For more helpful information and the archive of previous posts, look for items in the menu to the left.


bulldogstrong.jpg

Green Local Schools

Tech Integration Team

Tuesday, April 2, 2019

G Suite Accessibility Features

G Suite Accessibility Features

Make learning accessible to all your students.

Created by Scott Aten, April 2, 2019
Research shows that nearly 14% of students live with some sort of disability. Many of these students and their parents rely on some form of visual or audio accommodation to accompany their learning. In truth many of these accommodations benefit all students. This article will
provide information on some of the built in features of G Suite that can help make learning accessible to all students.


Learn more about these features and more on the Google Accessibility page. This site provides a complete list of all the accessibility features available in each Google app.

Google has put together this document to help illustrate all the accessibility features including features available on Chromebooks themselves. We are always available to help. Schedule a time with me using the link below.

[Schedule me to come and help]

For more helpful information and the archive of previous posts, look for items in the menu to the left.


bulldogstrong.jpg


Green Local Schools


Tech Integration Team
Tuesday, March 12, 2019

Add Background Music to Slides

Finally Sound in Slides

Play music in the background of Google Slides

Created by Scott Aten, March 12, 2019
Getting music to play in the background of Google Slides has been something that has been difficult to do like we used to be able to do in PowerPoint. In the past I have recommended teachers and students use the "Audio Player for Slides" add-on. This add-on was a little clunky and did not really do what we wanted it to do, but was the best option. Recently Pam Mattiazzo discovered that the add-on was no longer being supported, BUT they had an extension that did replace it. I have taken a look at this extension and found it to be exactly what we have been wanting for Slides.

  • You can play sound files (mp3) on one or more slides
  • You can play sound files (mp3) as background music
The MP3 file needs to be already saved in your Google Drive, but other than that the extension runs really well.

Here is a video of me


Here is a [short video] demonstrating it in action.

If you would like to schedule a time for me to come and help you setup this extension or assist your class in getting started, please use my scheduler to pick a time.

[Schedule me to come and help]

For more helpful information and the archive of previous posts, look for items in the menu to the left.


bulldogstrong.jpg

Green Local Schools

Tech Integration Team

Friday, April 20, 2018

Google Mail Checker

Google Mail Checker

An extension that will show you if you have gmail messages  
In case you have not heard, Green will be switching to Gmail on May 21st.  Training at GPS and GIS for teachers has already occurred and training for GMS, GHS, and Greenwood is coming.  Today I would like to introduce to you an extension that may prove to be helpful after May 21st. The extension is called “Google Mail Checker” and it lives in the extension area of your Chrome browser.  Once added this extension will give you a visual cue letting you know that you have new emails. You can also launch Gmail by clicking on the extension making it the fastest way to get into your gmail account.
How to install:
  1. Open your Chrome browser
  2. Login to your Google Account
  3. Access the “Web Store”
    1. On a Laptop or Desktop computer you simply click the Apps Button in the upper left corner .  Then click “Web Store”
    2. On a Chromebook click the circle in the lower left corner.  Then Click “Web Store” . You may have to scroll to see the “Web Store” app.
  4. In the “Web Store” type “Google Mail Checker” in the search box, then Search.
  5. Click the “+ADD TO CHROME” button
  6. Click “Add extension”
That is it, your extension is added in the upper right portion of your browser.  It now keep track of your Gmail account and let you know if you receive email. If you want to see the email simply click on the extension and your gmail will load.
For more helpful information and the archive of previous Check This Out! Digests, go to http://www.greenlocalschools.org/technology.aspx

bulldogstrong.jpg

Green Local Schools
Tech Integration Team

Monday, February 6, 2017

Anyone Can View

Never accidently share a document with the wrong permissions again.  
Have you ever created a Google document and passed a link to that document on to your students or colleagues only to get a message from them saying they don’t have permission to view it?  That is because by default Google documents are private. You have to click on the “Share” button and change the share permissions to “Anyone with the link can view”. With everyone being so busy, it is not hard to forget to take these steps.  
Enter the “Anyone Can View” Extension
If you add the “Anyone Can View” extension, anytime you open a document that has the ability to be shared (doc, sheet, slide, etc.) the extension will become active.  If you click on the extension the document sharing permissions are changed to “Anyone with the link can view” and it copies the URL to the clipboard. The link to the document is then ready for you to paste into an email, into a Google Classroom assignment, or into social media with the correct privileges for the person to be able to view it.
This extension was created by Alice Keeler, the author of “50 Things You Can Do WIth Google Classroom”.   Watch her explanation of how the extension works.
How to install the extension
  1. Go to the Chrome Web Store
  2. Search for “Anyone Can View”
  3. Look for the “Alice Keeler Anyone Can View” extension
  4. Click add to Chrome
  5. Click add extension
You will see the “Anyone Can View” extension with this icon in the upper right corner.  Just click on this whenever you want to automatically change the permission of a Google Doc to “Anyone with the link can view”.  
~Happy Sharing

For more helpful information and the archive of previous Check This Out! Digests, go to http://www.greenlocalschools.org/technology.aspx

Monday, January 30, 2017

Black Menu for Google

This productivity extension will give you quick access to your favorite Google tools from any webpage.  
I want to thank Marc Clendaniel for showing me this extension.  If you have not added any extensions to your Google account, this would be a good one try.  Black Menu is a productivity extension, so its main role is to help you do things faster and easier.  
What does it do?
Black Menu is an extension, so once added, it lives in the upper right corner of your browser.  That means it is always available on any webpage you visit. Black Menu is a drop down menu that has a customizable list of Google Apps.  It will give you the ability to use the app from within the menu itself without leaving the page you are visiting.
What Google Apps are available?
Black Menu comes with some of the common apps already listed, but you are able to add ANY Google App that you want to the menu.  You can also remove any apps that you feel you don’t use enough to have listed in the initial menu. But the nice thing is that ALL the apps are available from the “Search Google Shortcuts” area.   
Samples of things you can do:
Here is a quick list of some of the things you can do with Black Menu.
  1. Easily add your other Google accounts to the menu.  This makes it easy to bounce back and forth between your personal account and your school account.
  2. Change the order of the apps to put the ones you use most often at the top of the menu.
  3. Remove apps from the main menu that you don’t use.
  4. Add apps to the main menu that you do use (i.e. Google Classroom)
  5. Do a Google Search from within the menu.  This keeps you from going back to the Google homepage to do a search.
  6. Gives you quick access to your Google drive AND quick access to creating new Docs, Sheets, Slides, or Forms all from within the menu.
This video shows how to add Black Menu as well as demonstrates how the items listed above work.   You can view the video [Here].

For more helpful information and the archive of previous Check This Out! Digests, go to http://www.greenlocalschools.org/technology.aspx

Monday, December 12, 2016

Clipular

Great tool for grabbing images off the web to be easily used in G-Suite or other online applications.
As we say goodbye to 2016 and look forward to a nice long winter break, I thought I would share another easy to use Chrome extension that will make grabbing images off the web easier.  The extension is called “Clipular” and it will run directly from your Chrome extensions.
Step 1: Add the Clipular Extension to your Chrome browser
Login to your Google account and go to the web store (here is a reminder of how to access the webstore).     Search for Clipular and choose “Add to Chrome”, Then “add the extension”. Be sure that you are adding the extension, not the app.
Step 2: Using Clipular
Once Clipular has been added, you will see a teal box with the letter “c” in it sitting in the upper right side of your browser window.  You can now use this extension to grab any image off a webpage or to copy an entire screenshot. Once you find an image or page that you want to copy, click the “c”.  The scissors will allow you to grab a single image and the camera will allow you to take a picture of the entire page. If you click on the camera a screenshot is taken and saved.  If you use the scissors you will have to click on the image you want to copy then it will be saved.


Step 3: Using the images you have saved
All of the images and screenshots you save are stored in the “My Clips” area (green notebook).  From the “My Clips” area you can download the images, copy and paste the images to use in another application, or if you have the “Save to Google Drive” extension you can use it to get a copy of the image saved in your Google Drive.
If you would like to see a video of this tool in action, I have created a demo for you to watch.  Please note - you should always consider copyright when using images off the web.  It is possible within Google to search for images have various usage rights.

For more helpful information and the archive of previous Check This Out! Digests, go to http://www.greenlocalschools.org/technology.aspx

Tuesday, October 18, 2016

Google Cast for Education

Turn your computer into a wireless screen sharing device.
Looking for a way to quickly and easily have your students share their screen with you and to the class?  Then Google Cast for Education is the app for you. This app allows a student to request their screen to be shown on the teacher computer.  With the teacher computer connected to a projector, the entire class is able to see what is on the student computer. This is a great tool for showing student work, student presentations, or showing what they have found during a research session.
The app is easy to setup allowing you to invite an entire google classroom of students to participate.  Here is what you need to do:
  1. Go to the chrome Web Store and search for “Google Cast for Education”
  2. Click “Add to Chrome”
  3. The app is easily accessible from the Apps section in your browser.   (directions on how to access the webstore, launch apps  and add apps).  
  4. Click the “Show Apps” button .
  5. Click on the “Google Cast for Education” app to launch it.
  6. You will need to give your computer or receiver a name.  This is the name the students will see when they try to connect to you.  Add a name and click save.
  7. Click the Share button
  8. In the Add people section, click on the box that says “Emails, groups, and classes”.  You should see your Google Classrooms. Select the class you want to connect. Leave the setting “Teacher can present, Students can request”.
  9. You are now setup and ready to have students connect to your computer.
  10. Have the student you want to project their screen on your computer go into their chrome browser.  They need to click on the three dots in the upper right corner of the browser and choose “Cast” from the menu.   They will be asked what device they want to “Cast to”. They select the name you gave your computer.
  11. The teacher computer will get a request from the student. Click to allow the cast and the students screen will display on your computer.
Once finished click on the X at the top of the screen to end the cast session for that student.
This is a great way to engage students!


For more helpful information and the archive of previous Check This Out! Digests, go to http://www.greenlocalschools.org/technology.aspx